Right now, I can barely pen this. I am doing my best to keep sane, not break down or forgo everything. That said, I am trying to regain some sense of 'normal' around here, and one of those is to write a blog post or two. I am working on our Asia Continent Box and the Van Gogh artist study one now, but need a few things to finish it before I can publish it. Hopefully, I can get those done soonish. It will be posted on my main blog-Homeschooling on a Wing and a Prayer but I wanted to come here and let you all know what's been going on.
For those who do not follow me on FB-earlier in Jan. my dear brother passed away. He was only 46. If it weren't for the strength of the Lord and all the prayer warriors out there, I doubt I would have been able to get through it. It has been very hard for my parents, and especially for his two boys who are only 17 and 7. This is going to be a very long road for all of us. And if that was not enough to blow our lives out of the water, my husband's mother fell prior to our going out of the country in November (still want to blog about that) so since then we have been trying to help care for her as well. Since she is 81, her recovery has been slow. Even though (thankfully) she didn't break anything (her should took the brunt of it) she did damage the ligaments, and it took a huge emotional toll on her. She is looking into assisted living nearby but until then my hubby and his sisters have been sharing the responsibility to make sure she is OK. So then imagine being jet lagged and 6 hours off on time and being home only a few days prior to Thanksgiving. We saw my brother then, and knew it wasn't good. He was admitted to the hospital two weeks later. Then three terrible weeks crawled by, and let me tell you there was not much Christmas spirit around here. Then on Jan. 8th he passed away. It was the longest stretch of hell I have ever experienced. To add to this-a week prior to that, my friend's mother died. Then just as we were starting to regain some footing a local family lost their 4 yr old son suddenly (he had special needs but this was unexpected) just a day later, my husband's good friend's dad suddenly died. I say-ENOUGH! This is just too much. The sadness and loss is immense around here. I forgot to add that my husband had some suspicious skin lesions removed. During all of this chaos. We found out just a week after the funeral that one was basal cell carcinoma. So that means he will need to see a surgeon to get it completely removed, thankfully-the type of surgery he will receive is usually 99% successful in removing it. That is coming up in March.
**I came back to add that ditty on my hubby-and while I type this, I am nursing a lovely mini-sprain I got today while leaving the library. I was just walking normal like and because the parking lot had grooves/crevices from age, it caught my left ankle...the very one I broke just a couple years ago. I am praying it is just a few days of minor swelling and pain. I can only laugh because otherwise I do believe I would start crying and never stop. So much for a great beginning to the new year. I pray the middle and end of it is awesome instead of crappy like these past few weeks.
Schooling has been minimal but I have managed to get a few subjects taught per day. I have difficulty keeping thoughts in my head longer than a few minutes, so even the idea of workboxing (which I am sure would make my life easier in the long run) have fallen to the wayside. Since the boy is a teen, I don't have to be so concerned since he can follow verbal instructions-well when I can get him to sit still long enough. Did I mention that I really don't have a human child but an overgrown hummingbird for a kid? He is a tough one to pin down. Anyway-that is where we are at.
Please keep us, my parents/2 other brothers, my nephews, my mother in law (Lu), my friend and her family (Nancy), the Kroll family (adopted, they are a Reece's Rainbow family) and our friend John and his family in your prayers. We all desperately need them. Thanks
Friday, February 6, 2015
Tuesday, November 4, 2014
Continent Boxes: Australia and Antarctica
I have a few new posts up on my main blog regarding our Continent Boxes for Australia and Antarctica. Meant to provide a fun, hands-on way to explore different cultures, these boxes hold a variety of goodies that reflect the animals, food, currency and items one could find there.
 To use the workbox for this, simply place a card in the box instructing the student to go through it. Oh, and possibly a timer because we all know how a child can get lost in an activity like this. If you have a worksheet that may go along with it, then you could toss that into it as well. I made the card to the left here, but have not uploaded it anywhere so my readers can print it. I haven't done that in a while, so once I have time to dust off the cobwebs of my mind-I will do that. More than likely I won't be able to get to that until sometime in December tho. I have a lot of stuff coming up and very little time. Anyhoo- you can visit my blog to read up on what I have in ours, and take a look at the Aboriginal painting project we did. It was simple, not too spency and fun!


To use the workbox for this, simply place a card in the box instructing the student to go through it. Oh, and possibly a timer because we all know how a child can get lost in an activity like this. If you have a worksheet that may go along with it, then you could toss that into it as well. I made the card to the left here, but have not uploaded it anywhere so my readers can print it. I haven't done that in a while, so once I have time to dust off the cobwebs of my mind-I will do that. More than likely I won't be able to get to that until sometime in December tho. I have a lot of stuff coming up and very little time. Anyhoo- you can visit my blog to read up on what I have in ours, and take a look at the Aboriginal painting project we did. It was simple, not too spency and fun! Saturday, October 18, 2014
New posts about our Geography Center/Shelf and mapping supplies
To save myself some time, I simply linking some new posts here. I have a couple new ones up on my main blog about our Geography Shelf (puzzle box holder) and on some of the materials we are using to cover our World Geography mapping, etc.
The Mapping the World by Heart folder, along with everything he needs to complete his current work goes into his workbox. I simply fill it with the supplies as needed. He is older so I don't need to write too many lengthy notes, he pretty much knows that is what he will have to do until the current continent is completed. A 'go to the geo shelf' or 'work on....' note can also be placed in the workbox to add in hands-on activities as well. We've assigned box #3 for the Geo study for the year. Usually I rotate subjects in the boxes but have found that having him do the map/geo work earlier is better. He gets too distracted as the day goes on so it is staying in box 3 for this year.


The Mapping the World by Heart folder, along with everything he needs to complete his current work goes into his workbox. I simply fill it with the supplies as needed. He is older so I don't need to write too many lengthy notes, he pretty much knows that is what he will have to do until the current continent is completed. A 'go to the geo shelf' or 'work on....' note can also be placed in the workbox to add in hands-on activities as well. We've assigned box #3 for the Geo study for the year. Usually I rotate subjects in the boxes but have found that having him do the map/geo work earlier is better. He gets too distracted as the day goes on so it is staying in box 3 for this year.
Anyhoo-here are the links.
Thursday, July 24, 2014
Working on classroom area and projects
I have not been posting much mainly because I haven't done anything earth shattering. But I have been working behind the scenes on rearranging our classroom area, reorganizing/setting up the workboxes a tad differently, as well as the usual decluttering/cleaning out the area purge.
I needed to get our classroom area under control and I am almost there. I hope to be done in time to post for the Not-Back-To-School blog hop and I also want to do a video tour of our room/stuff for those who enjoy a more realistic peek into homeschool rooms. Hopefully, I will have that done soon. But with all the summer activities and such-I dunno. I am trying tho.

I did find a scrapbook page that I liked enough to put onto our Geography Box so that is just about complete (outside of new hinges and velcro dots for the maps to adhere to) so I am totally geeked about that. I am working to put together continent boxes which has been a lot of research and looking for goodies to go in them. I will be working on Australia first since that ties into our SL history this coming fall. I have a lot to do still but hope to get a lot done when I am up north with my pal during our annual scrapbooking/crafting weekend getaway.
That is about all that is new around here. Look for new posts coming in August. Til then, enjoy your summer!
I needed to get our classroom area under control and I am almost there. I hope to be done in time to post for the Not-Back-To-School blog hop and I also want to do a video tour of our room/stuff for those who enjoy a more realistic peek into homeschool rooms. Hopefully, I will have that done soon. But with all the summer activities and such-I dunno. I am trying tho.
I did find a scrapbook page that I liked enough to put onto our Geography Box so that is just about complete (outside of new hinges and velcro dots for the maps to adhere to) so I am totally geeked about that. I am working to put together continent boxes which has been a lot of research and looking for goodies to go in them. I will be working on Australia first since that ties into our SL history this coming fall. I have a lot to do still but hope to get a lot done when I am up north with my pal during our annual scrapbooking/crafting weekend getaway.
That is about all that is new around here. Look for new posts coming in August. Til then, enjoy your summer!
Friday, April 25, 2014
The evolution of our workboxes from the first use to now
I have been a bit of a Pinterest addict lately, and one of the key focuses has been the workbox. Yes, even though we have been on the workbox bandwagon for years now, I still love to check out other folks' boxes and how they implement it in their schooling.


This is an example of how I had the area set up for my son to put finished materials and work. It changed a lot because I tend to move things around a ton.


So I got to thinking. Perhaps a post highlighting our changing boxes throughout the years may be helpful to the new-to-workbox peeps; and to those who love to see how a family will tweak their boxes as they go along. When we started I had an 8 yr old elementary student and a high school student. So I had to create two types to meet my family's needs.
Version 1: Elementary
This is how we started our elementary student. Since I did a review of Sue Patrick's book, I wanted to implement the workboxes as close to her suggested way as possible. Some things worked, others did not. My son does not need many of the repetitive steps and I did not want finished boxes on the floor, so I eliminated those ideas pretty much right from the start. Hey, I do my own thing. I also know that at times we'll need to tweak the process when different issues and needs pop up-and am totally fine with changes. I just stay true to us and what works for us.
The shoe rack and clear shoe boxes set-up. Highly recommend using this as your first style (unless you are in a tiny space) because it is one of the least expensive ways to go.
This is an example of how I had the area set up for my son to put finished materials and work. It changed a lot because I tend to move things around a ton.
Version 1: High School
My high schooler needed some organization but I did not want to spend much money because she only had 3 years of school left. So we didn't get all giggity with her workboxes. This is what I came up with for her at first, then when I decided to go to the Trofast system, she had 6 boxes and my son had 6.
I bought this clear, acrylic file holder at Staples. It worked great for all her lighter weight assignments. I also bought color top loading files.
Her station for putting her completed work and activities.
She usually had a 'Holding Station'
card for her heavy textbook work.
FINAL VERSION: OUR FAVORITE
IKEA Trofast storage drawer units
These move easily, and are in two separate units. They can fit many
different arrangements that our room seems to
experience throughout the year.
[Wonder how that happens? LOL]
The return boxes usually were on the floor nearby
or they left the stuff in the drawers.
I now have a large red box in the bottom of the right unit
for him to use as the return box.
And there you have a quick look at how we tweaked the units to work for us. I didn't need to worry too much about space (for once) so I was able to get larger workbox systems. Those who have smaller school areas/homes would need to use less space absorbing ones like file totes, wall hanging holders, binders and so forth. Pintrest is full of many, many ideas, so be sure to check out that valuable resource.
Monday, April 21, 2014
Schedule Book scribd page links and updated binder use for it
OK so I am frustrated and figured I would just list a group link to the pages for the schedule book because I am (now) not seeing Monday showing up either even tho I know it is there. So hopefully, these links will get you to the pages to be able to print the basic schedule book. There are other pages with little tags for it but I am seeing them show up, so check the whatsinthebox (my user name for Scribd) for those.

I put the schedule book into a 3-ring binder. I cut off the spiral binding and then trimmed up the edging a tad. I will need to put clear tape on the edge because I cut the 'melted' part of the lamination off to do this. To avoid any further damage-or have it split apart, I will have to do a simple clear tape fix-it job on it. After cutting off the edging I punched the holes and placed it into the binder. Now in hindsight, if I had decided to put it in a binder instead of getting it spiral bound, I would have avoided the need to doctor it up. I also could have changed the outside of the front cover to anything really-maybe a blocked page with a spot to put a label for the month or something. I dunno-but since it is what it is, it shall stay as is. I did have to make a new cover for the outside of the binder-which was easy to do. The reason I chose to change this up is because I can now place the schedule book upright if need be (otherwise, with the spiral binding it slumped over) and the pockets will allow for a printed sheet with any other 'need to know for your week' data the boy will require. I can change that out each week, or month.
Haven't quite decided how to tweak it all out since we are literally coming back to using this. I missed it. He needs it and I hope it does what it is intended to do-keep him from being a wanderer and from not being focused. Ah, pre-teen boys-the challenges of keeping them motivated. Now for next year he will have different schedule book pages (will make over the summer-most likely will be all car or baseball themed) but figured I would get my time's worth out of this one for the rest of the semester. We'll go a tad more grown up for his first year as a Jr. High student (in the fall). I will still use tags that Velcro on tho to keep me from having to constantly type or write out repetitive activities.


I just put a few tags on for an example. I am in the process of making new ones-esp. for the world geography we'll be covering next year, and other various tags that relate to his current interests.
The original style
New idea for this year:
I put the schedule book into a 3-ring binder. I cut off the spiral binding and then trimmed up the edging a tad. I will need to put clear tape on the edge because I cut the 'melted' part of the lamination off to do this. To avoid any further damage-or have it split apart, I will have to do a simple clear tape fix-it job on it. After cutting off the edging I punched the holes and placed it into the binder. Now in hindsight, if I had decided to put it in a binder instead of getting it spiral bound, I would have avoided the need to doctor it up. I also could have changed the outside of the front cover to anything really-maybe a blocked page with a spot to put a label for the month or something. I dunno-but since it is what it is, it shall stay as is. I did have to make a new cover for the outside of the binder-which was easy to do. The reason I chose to change this up is because I can now place the schedule book upright if need be (otherwise, with the spiral binding it slumped over) and the pockets will allow for a printed sheet with any other 'need to know for your week' data the boy will require. I can change that out each week, or month.
Haven't quite decided how to tweak it all out since we are literally coming back to using this. I missed it. He needs it and I hope it does what it is intended to do-keep him from being a wanderer and from not being focused. Ah, pre-teen boys-the challenges of keeping them motivated. Now for next year he will have different schedule book pages (will make over the summer-most likely will be all car or baseball themed) but figured I would get my time's worth out of this one for the rest of the semester. We'll go a tad more grown up for his first year as a Jr. High student (in the fall). I will still use tags that Velcro on tho to keep me from having to constantly type or write out repetitive activities.
I just put a few tags on for an example. I am in the process of making new ones-esp. for the world geography we'll be covering next year, and other various tags that relate to his current interests.
Wednesday, March 19, 2014
Geography box-Montessori style
I have posted a whole ditty about the Montessori Geography box I have been working on. You can read about it over on my main blog: Homeschooling on a Wing and a Prayer.


Tuesday, January 14, 2014
Well using our workboxes has been an epic fail but just trying to keep it real here
Yes, I admit it-I have failed miserably with utilizing the workboxes this past semester! I mean epic fail. But then again, since I only have one student we don't need them quite as much because my boy gets all my attention. One of the big reasons I originally chose to go the workbox route was to help my 2 kiddos (wish I had known of this when I had four underfoot!) to be able to work at their own speed, on various subjects, in an organized manner. But honestly, it was mostly for me. As in saving my sanity, keeping me on a somewhat decent schedule of what we needed to cover and more than anything-it gave me a breather here and there.
 Simply put, I was able to give them each stuff to work on independently without my having to answer the "What's next?" or "Where's the ....?" 30x an hour-so that I could do more focused work with them individually when needed. It was work to get them 'stuffed' but it was time well spent. I was like a routine machine, and after a bit of time loading those puppies I was like Speedy Senorita Sally and could whip those together in less than 20 mins for both of them! Alas, those were the days.
Last semester I looked over what we'd be doing and decided it was not worth the time/effort to use them as much, so they became our 'store the stuff' boxes. I have six by my desk that house the various materials we are using this year and he has six which he stuffed his various workbooks, texts and such in. It was a good situation. It worked. But changes are on the horizon! I do believe I will be able to use them as intended soon...well I did just the other day-was so proud of myself!
What I have found, like with anything really, is that no matter where you are in your journey there are times where things work and then there are times where you need to just put ideas/methods aside. That happens with curriculum, with methods, groups/co-ops, and such. It is not a sign of failure. Granted I labeled this post as an 'epic fail' but my lack of using workboxes as they are intended to be used IS NOT failing. It is adapting.
It is my way of stating that yes, best intentions sometimes get waylaid. But more importantly it's my way of encouraging you (if weary or tired or a tad burned out) that with the ebb and flow of life and homeschooling you need to be flexible and adjust to fit the current needs of your family and current life situations. It's OK. And frankly speaking here-it's better that you do change things up. Way better than 'sticking to your guns' and not veering off course come 'H E double hockey sticks or high water'. That is a one way ticket to Doomsville O'Burnout. I strongly encourage you to avoid that ride at all costs.
If you have been struggling to keep up with the workboxes (or other various homeschooling/life things) step back and readjust to fit to what you need now.
If you do need the workboxes but have become a 'slacker' then try to just do 1/2 the amount of boxes you normally would and do more group or one-on-one time. Take some of the load off of yourself so you can recharge. Take that time to figure out where in the process you are struggling and see if you can find some solutions to help you streamline your efforts. Look thru Pinterest, other workboxing blogs and of course, here. Maybe I have some older posts that you may have missed.
If it is your student that struggles using them-then perhaps dear reader they are not the right way to motivate your student. You may need to try other options. And that is OK too.
So even tho I have this blog dedicated to workboxing, it doesn't always mean we actually workbox. And there you have it, just keeping it real.
Friday, August 30, 2013
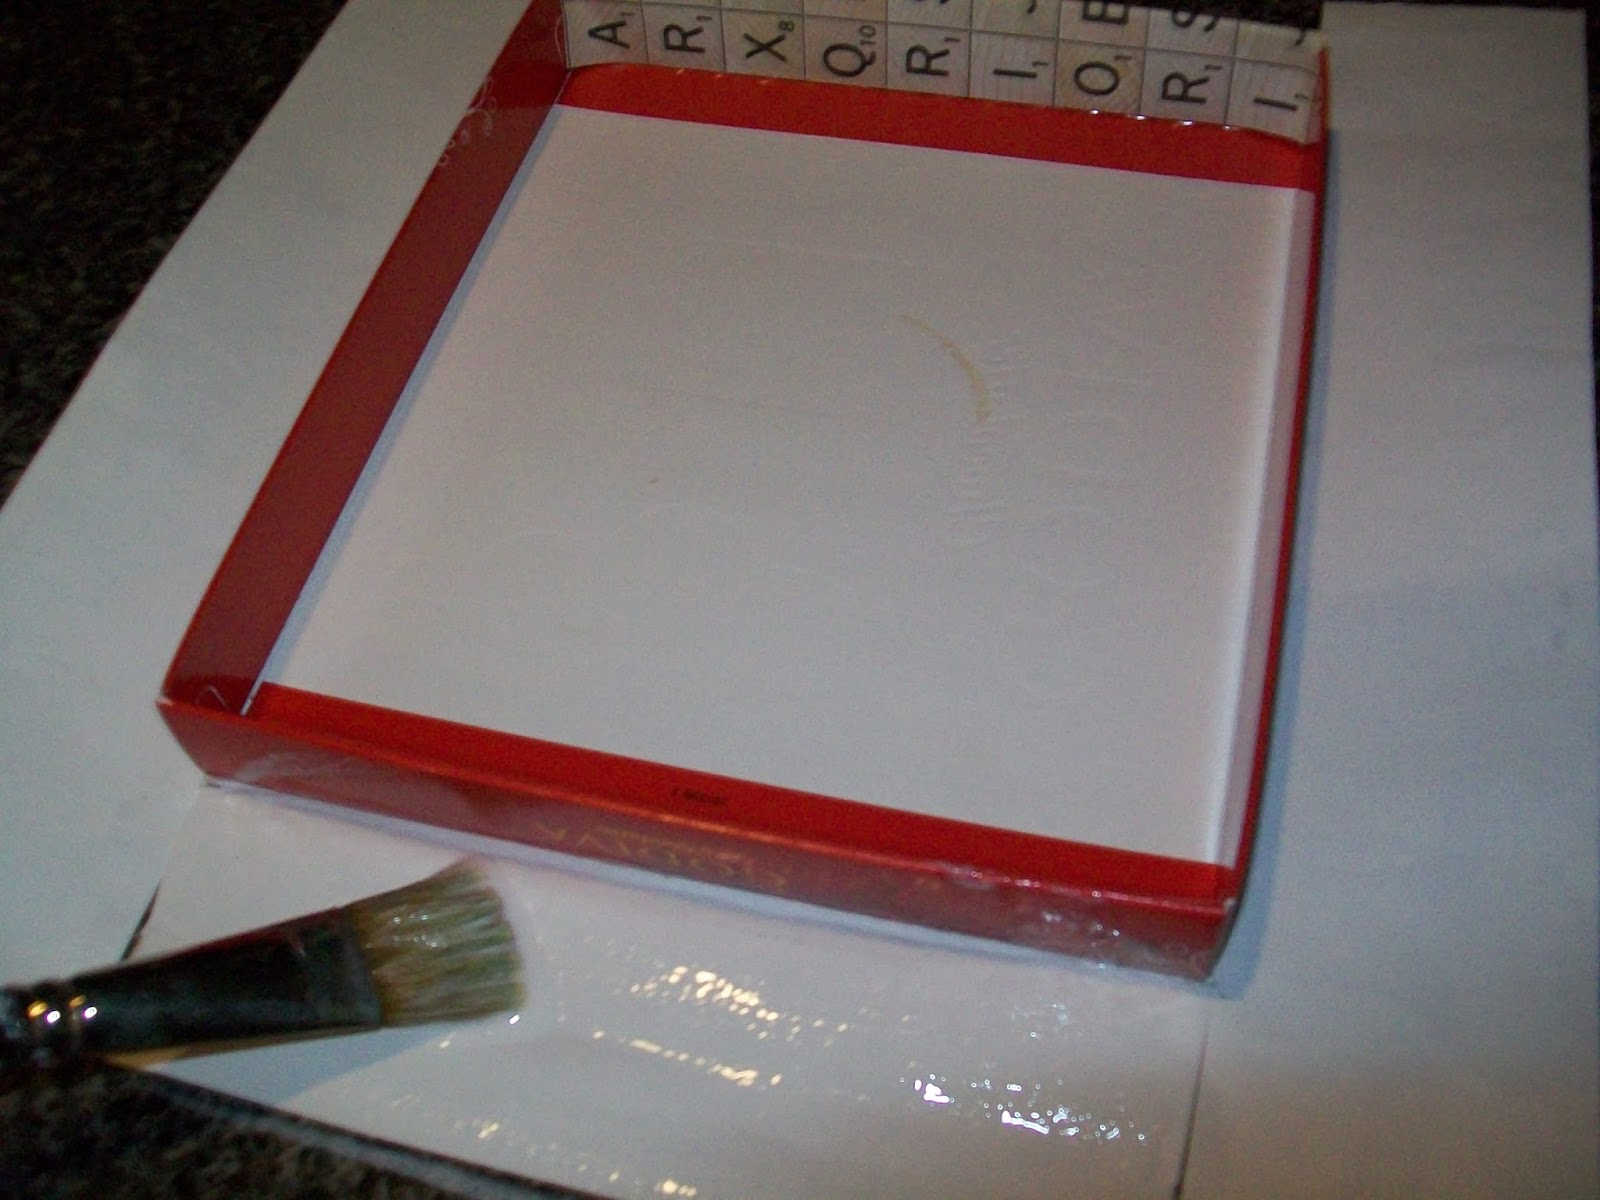
Making activity component/ trinket boxes [for Montessori works, hands-on-activities] out of food boxes
So what does one do with all those little pieces or parts that are a must when using Montessori works [aka: a specific activity meant to teach something], or some matching activity or whatever it is you have that will need to be contained? What can you use that keeps them all nice and tidy and looks good too?
 Well, being frugal is always a great way to start. So you search your humble abode, and perhaps even ask friends/family for those particular boxes that once housed delicate chocolates or sugar packs. Then you scrounge thru your various scrapbooking paper, collect glue, scissors, a bowl and a brush and you get busy. And that is exactly what I have done lately. Whenever we get (usually a gift) those nice quality chocolates, I always save the boxes. My husband actually found one I tucked away and he had the nerve to pitch it. I gasped in horror and immediately plucked it from its demise. Thankfully there wasn't anything in the trash yet so it was safe from grossness, and I must say-he won't make that mistake again. The shocked look from such outlandishness across my dazed face surely left a lasting impression on him. LOL
Anyhoo-the reason I am posting this because there are times folks need a box or something to hold those little goodies. So why pay a lot of cashola for something you can make? I don't know why you would. I try my best re-purpose things when I can; this is a fun, creative way to get a few storage boxes that are sturdy and useful for our schooling needs.
 Now I do not have a canister of Modge Podge about the house, so I did what any frugal gal would-I made the 'poor man's version' of it using Elmer's Glue and water to thin it. Worked like a charm!
Figured I would just do a picture tutorial (for those who have never tried such things) and put a wee comment under when necessary. Hope this helps you out.
 Find a piece of scrapbook paper that appeals to you. I recommend using the thinner style. Then figure out there the lid fits best-allowing for enough paper to cover up over the sides and slightly over into the inside edge.


 Trim off any excess and tuck the corners in nicely. Try not to over do it on the inside because the extra bulk may prevent the lid from going over the bottom.


Now I have a lovely box to contain language materials. And hey, if it gets crushed-well I am out like 30 cents. Not too shabby! :)
 Well, being frugal is always a great way to start. So you search your humble abode, and perhaps even ask friends/family for those particular boxes that once housed delicate chocolates or sugar packs. Then you scrounge thru your various scrapbooking paper, collect glue, scissors, a bowl and a brush and you get busy. And that is exactly what I have done lately. Whenever we get (usually a gift) those nice quality chocolates, I always save the boxes. My husband actually found one I tucked away and he had the nerve to pitch it. I gasped in horror and immediately plucked it from its demise. Thankfully there wasn't anything in the trash yet so it was safe from grossness, and I must say-he won't make that mistake again. The shocked look from such outlandishness across my dazed face surely left a lasting impression on him. LOL
Anyhoo-the reason I am posting this because there are times folks need a box or something to hold those little goodies. So why pay a lot of cashola for something you can make? I don't know why you would. I try my best re-purpose things when I can; this is a fun, creative way to get a few storage boxes that are sturdy and useful for our schooling needs.
 Now I do not have a canister of Modge Podge about the house, so I did what any frugal gal would-I made the 'poor man's version' of it using Elmer's Glue and water to thin it. Worked like a charm!
Figured I would just do a picture tutorial (for those who have never tried such things) and put a wee comment under when necessary. Hope this helps you out.
The Basics:


Cut to the area where the corners meet
-but not too far in as you can always fix as you go.

Put a nice, but not too heavy layer of glue down on the
lid then lay down in the center area of your paper.

Flip over and use one of those handy-dandy Pampered Chef
scrapers (or a soft edged tool) to get rid of any air bubbles.

Glue, fold and press out any bubbles, along all sides.


Let dry thoroughly. I actually did two coats.
Very smooth and durable.
And there ya go-


Now I have a lovely box to contain language materials. And hey, if it gets crushed-well I am out like 30 cents. Not too shabby! :)
Wednesday, August 21, 2013
Science/Zoology Ideas: cross post from my Hsing on a Wing and a Prayer blog
Just wanted to post this from my other blog, in case you don't go there. These ideas are nice and the trays and goodies will fit into a workbox. One could even just put them in a Ziplock if space is an issue. Enjoy.
We're going to be covering birds and insects and swimming creatures this year for science. I have always enjoyed activities that help reinforce the lessons by using fun little goodies to do so. Being that I have a Montessori background, and love the Charlotte Mason method-I try to combine the best of both worlds when I can.

So I found (like why didn't I take a closer look at these before? Really? I am not happy with myself for walking right past these little gems for some time now-OY!) Safari Ltd. Toobs. These containers hold a nice amount of critters, or people or flowers or well-known landmarks that can easily be tied into most lessons. One can use them for map work, science activities, matching lessons, and more. So my goal is to collect the Toobs we need for our year. I should have all or at least most of them bought before Oct/Nov. I am of course, focusing on the immediately needed ones first. I have already purchased both the backyard birds and the exotic birds sets. Being that I hate paying full price, and the couponer in me demands this-I gathered up my 40% and 50% coupons for JoAnns to save a few bucks-which I could use b/cuz they were not on sale. JoAnns has them for around $9 something and so I was able to get one for about $5 ish and the other around $6ish. I will continue to use the coupons until I have all the sets I want :)!

Thankfully, on the Safari Ltd. site, you can click the image to see what is included. If you ctrl/prt sc then go to MS Paint (if you have such programs) you can cut/trim it and then save it to put onto MS Word to create a control card for your activity. I enlarged one kinda big (for youngers to place the actual bird onto) but it kinda fuzzed the wording. So I also shrunk it to a better size (as a control card for my son) that isn't so bad. I also used the MS Word to create name cards as well. I then printed and laminated for long term use.
I then will put it on the tray (as pictured, but I am going to paint it white) when we get to those chapters in science. It is just a kinda fun extra thing for my son to do to stave off boredom. For the younger set-it is a great activity (very Montessori) to help learn the different birds (or whatever critter you want to study). The basic deal is that the student takes the word card and matches it to the right bird.

I will also be purchasing the N.A. animals and the river ones too. I need that snapper from the river set to use along the Minn of the Mississippi book (BFB geography). Figured we would have fun occasionally moving the turtle down the great Mississip (with our sense of humor I am sure it'll be interesting) map that he fills in/colors as he goes thru the chapters. And it'll serve as a great replica of what a real one looks like. Mind you-he's already had fun poking at a snapper or two when his dad and him have been out and about on their walks. He knows a snapper and understands just why it is called one. That said, because this is one critter you do not want to handle for real-this is a great option to have! LOL. Plus, I can pull a lot of those animals from the river set for our history study of the expansion west (in the US) that we're tagging into our Calf. history (by BFB). Once I get a fun set together for that-I will be sure to post.

I also printed off a free coloring page of a snapper to use to teach turtle parts. He covered that way back when he was in Kindergarten but obviously, it's been a while and why not revisit it? So I will the laminated pic, some Vis-a-Vis markers and a control card (still need to create) that he can use to remember them. He'll just use different colors for different parts. I will also make an actual turtle control card with the correct areas labeled so he can self-check it. I will probably do it for the Seagull one I have when we do the book, Seabird. I have to go thru the Apologia notebooking wkbk I bought to go along with the Zoology 1 I have. If they don't do that-then I will create one.
This is just a simple idea that can create a fun, integrated 'accessory' for your student's learning experiences. Think outside the one-dimensional when you are looking for different ways of teaching and you'll be surprised at what you find!
**the Toobs use the correct names for most of their sets, which is good b/cuz I prefer the child learns the right name of an animal. For the younger kids, you can get away with saying "bird" or "flower" but it does help significantly if you label it as it should be-their specific name. I will also make cards with the Latin names for my son to match up because when we do our nature study notebooks (CM way), we always add that and I want to be sure to provide another opportunity for him to learn them.
**I am not an associate for these companies-altho I should be LOL. Just wanted to share what we have found to be very useful for our lessons.
We're going to be covering birds and insects and swimming creatures this year for science. I have always enjoyed activities that help reinforce the lessons by using fun little goodies to do so. Being that I have a Montessori background, and love the Charlotte Mason method-I try to combine the best of both worlds when I can.

image from the Safari Ltd. site

image from the Safari Ltd. site
Thankfully, on the Safari Ltd. site, you can click the image to see what is included. If you ctrl/prt sc then go to MS Paint (if you have such programs) you can cut/trim it and then save it to put onto MS Word to create a control card for your activity. I enlarged one kinda big (for youngers to place the actual bird onto) but it kinda fuzzed the wording. So I also shrunk it to a better size (as a control card for my son) that isn't so bad. I also used the MS Word to create name cards as well. I then printed and laminated for long term use.
I then will put it on the tray (as pictured, but I am going to paint it white) when we get to those chapters in science. It is just a kinda fun extra thing for my son to do to stave off boredom. For the younger set-it is a great activity (very Montessori) to help learn the different birds (or whatever critter you want to study). The basic deal is that the student takes the word card and matches it to the right bird.

I will also be purchasing the N.A. animals and the river ones too. I need that snapper from the river set to use along the Minn of the Mississippi book (BFB geography). Figured we would have fun occasionally moving the turtle down the great Mississip (with our sense of humor I am sure it'll be interesting) map that he fills in/colors as he goes thru the chapters. And it'll serve as a great replica of what a real one looks like. Mind you-he's already had fun poking at a snapper or two when his dad and him have been out and about on their walks. He knows a snapper and understands just why it is called one. That said, because this is one critter you do not want to handle for real-this is a great option to have! LOL. Plus, I can pull a lot of those animals from the river set for our history study of the expansion west (in the US) that we're tagging into our Calf. history (by BFB). Once I get a fun set together for that-I will be sure to post.
The beauty is you can create what you need.

I also printed off a free coloring page of a snapper to use to teach turtle parts. He covered that way back when he was in Kindergarten but obviously, it's been a while and why not revisit it? So I will the laminated pic, some Vis-a-Vis markers and a control card (still need to create) that he can use to remember them. He'll just use different colors for different parts. I will also make an actual turtle control card with the correct areas labeled so he can self-check it. I will probably do it for the Seagull one I have when we do the book, Seabird. I have to go thru the Apologia notebooking wkbk I bought to go along with the Zoology 1 I have. If they don't do that-then I will create one.
This is just a simple idea that can create a fun, integrated 'accessory' for your student's learning experiences. Think outside the one-dimensional when you are looking for different ways of teaching and you'll be surprised at what you find!
**the Toobs use the correct names for most of their sets, which is good b/cuz I prefer the child learns the right name of an animal. For the younger kids, you can get away with saying "bird" or "flower" but it does help significantly if you label it as it should be-their specific name. I will also make cards with the Latin names for my son to match up because when we do our nature study notebooks (CM way), we always add that and I want to be sure to provide another opportunity for him to learn them.
**I am not an associate for these companies-altho I should be LOL. Just wanted to share what we have found to be very useful for our lessons.
Subscribe to:
Posts (Atom)