Showing posts with label Science Ideas. Show all posts

Tuesday, September 29, 2015

I have two new posts on our Technology/Engineering/STEM activities

I know some of you don't follow both blogs-so I thought I would link in the two posts here for you. My son has been working on the AmeriKit European Siren and the Elenco FM radio kit.  These are really fun for kids who like this sort of thing and it also counts as hands-on experience that you can tie into the final grade/transcript for your class.

I also did a quick Q and A Show and Tell video of his project as well.  Be sure to visit my Homeschooling on a Wing and a Prayer blog often as I don't post pert near as often here.


Soldering post with European Siren

FM radio mini post on the FM radio with a video

Wednesday, April 29, 2015

Geology/Archaeology: Dino Dig activity in the Workbox


Just a quick peek at a fun workbox we had today.  I found these little kits at the Dollar Tree (there was the dino and one with an Egyptian Sarcophagus) and bought them because I figured they would fit nicely into our geology and archaeology lessons.  I added a few of the tools he'd need [into the box] to bust up the cast as well.  Then whilst I read from his science lesson, he diligently chipped away at the mold to find the wee little dino.


Wednesday, August 21, 2013

Science/Zoology Ideas: cross post from my Hsing on a Wing and a Prayer blog

Just wanted to post this from my other blog, in case you don't go there.  These ideas are nice and the trays and goodies will fit into a workbox.  One could even just put them in a Ziplock if space is an issue.  Enjoy.

We're going to be covering birds and insects and swimming creatures this year for science. I have always enjoyed activities that help reinforce the lessons by using fun little goodies to do so.  Being that I have a Montessori background, and love the Charlotte Mason method-I try to combine the best of both worlds when I can.

image from the Safari Ltd. site

So I found (like why didn't I take a closer look at these before? Really? I am not happy with myself for walking right past these little gems for some time now-OY!) Safari Ltd. Toobs.  These containers hold a nice amount of critters, or people or flowers or well-known landmarks that can easily be tied into most lessons. One can use them for map work, science activities, matching lessons, and more.  So my goal is to collect the Toobs we need for our year. I should have all or at least most of them bought before Oct/Nov.  I am of course, focusing on the immediately needed ones first.  I have already purchased both the backyard birds and the exotic birds sets.  Being that I hate paying full price, and the couponer in me demands this-I gathered up my 40% and 50% coupons for JoAnns to save a few bucks-which I could use b/cuz they were not on sale. JoAnns has them for around $9 something and so I was able to get one for about $5 ish and the other around $6ish.  I will continue to use the coupons until I have all the sets I want :)! 

image from the Safari Ltd. site

Thankfully, on the Safari Ltd. site, you can click the image to see what is included. If you ctrl/prt sc then go to MS Paint (if you have such programs) you can cut/trim it and then save it to put onto MS Word to create a control card for your activity.  I enlarged one kinda big (for youngers to place the actual bird onto) but it kinda fuzzed the wording. So I also shrunk it to a better size (as a control card for my son) that isn't so bad. I also used the MS Word to create name cards as well.  I then printed and laminated for long term use.

I then will put it on the tray (as pictured, but I am going to paint it white) when we get to those chapters in science.  It is just a kinda fun extra thing for my son to do to stave off boredom.  For the younger set-it is a great activity (very Montessori) to help learn the different birds (or whatever critter you want to study). The basic deal is that the student takes the word card and matches it to the right bird. 


I will also be purchasing the N.A. animals and the river ones too.  I need that snapper from the river set to use along the Minn of the Mississippi book (BFB geography). Figured we would have fun occasionally moving the turtle down the great Mississip (with our sense of humor I am sure it'll be interesting) map that he fills in/colors as he goes thru the chapters. And it'll serve as a great replica of what a real one looks like. Mind you-he's already had fun poking at a snapper or two when his dad and him have been out and about on their walks. He knows a snapper and understands just why it is called one. That said, because this is one critter you do not want to handle for real-this is a great option to have! LOL.  Plus, I can pull a lot of those animals from the river set for our history study of the expansion west (in the US) that we're tagging into our Calf. history (by BFB).  Once I get a fun set together for that-I will be sure to post.

The beauty is you can create what you need. 


I also printed off a free coloring page of a snapper to use to teach turtle parts.  He covered that way back when he was in Kindergarten but obviously, it's been a while and why not revisit it?  So I will the laminated pic, some Vis-a-Vis markers and a control card (still need to create) that he can use to remember them. He'll just use different colors for different parts. I will also make an actual turtle control card with the correct areas labeled so he can self-check it.  I will probably do it for the Seagull one I have when we do the book, Seabird.  I have to go thru the Apologia notebooking wkbk I bought to go along with the Zoology 1 I have. If they don't do that-then I will create one. 

This is just a simple idea that can create a fun, integrated 'accessory' for your  student's learning experiences. Think outside the one-dimensional when you are looking for different ways of teaching and you'll be surprised at what you find!

**the Toobs use the correct names for most of their sets, which is good b/cuz I prefer the child learns the right name of an animal. For the younger kids, you can get away with saying "bird" or "flower" but it does help significantly if you label it as it should be-their specific name.  I will also make cards with the Latin names for my son to match up because when we do our nature study notebooks (CM way), we always add that and I want to be sure to provide another opportunity for him to learn them. 

**I am not an associate for these companies-altho I should be LOL. Just wanted to share what we have found to be very useful for our lessons.

Tuesday, October 16, 2012

Finally did some nature study-what is in the box you ask?

When we went to have my dd's wisdom teeth evaluated, we found oodles of these pods laying about under a tree that I didn't recognize.  So to keep the boy busy I had him gather some up (that translates to him not picking up the ones already on the ground-like every good boy he jumped and jumped and tried to gather from the largest tree all those pods that were way up there. Well at least he got rid of some of his ya-yas before we went into the appt.).  Later in the week, I put them in a shoebox workbox with the tree identifying book, some paper, a pencil, tweezers, a magnifier and a container.  The goal?  To open those babies up and examine the seeds, count them, average them and to just kinda explore these crazy pods.

We figure it is a Honeylocust (thornless version) since it fit the description to a T, was used as landscaping for that building and such.  He enjoyed the task.  Well, say for the beetle that popped out of a pod.  He jumped a bit since he wasn't expecting it and that little beetle took a swim into the depths of the sewer line (aka: it was flushed).  Oh and the biggest pod held 26 seeds!  We have them saved and will disperse them about hoping the birds/animals eat and distribute them later via the natural way (since they do germinate better when they go thru a critters system).  I didn't have him record or draw them this time-since we were running behind on other activities but I truly don't feel we need to journal/data entry/draw every. single. thing. we do in nature study. But I am a rebel like that.


Hopefully, we'll have a few of the Honeylocust trees in our neighborhood (in a few years) and maybe next time I will be a better NS instructor and request a notation in his nature study book-or maybe not.


Friday, August 10, 2012

Science: Apologia Land Animals Activity

We are currently studying the Apologia Land Animals of the Fifth Day as a part of our Heart of Dakota Creation to Christ study and I decided to make this activity to go along with the animals study.

Land Animals/Continents Match
*most animal images from National Geographic Stock Images

I simply made copies of each continent [from my Montessori collection of maps], added the title of it, glued them onto a reg. sized piece of card stock and then laminated them. I used a couple online sites (I think National Geographic** site has the best pics) and copy/pasted them to a MS Word document, shrunk them in size then copied them off.  Cut them out, placed a number on the back and then I will created a master list where the name of the critter matches the number and what continent(s) it can be mostly found on.  I went by the names found in the study and added a few extras when I saw that they also came from that continent.  I still have a few more to find but it is a good start.

The boy can then take this out-lay the correct critters on the correct continent and then I can check the work after.  This is the basic activity.  Some animals go on multiple continents so I need to do one of two things: make copies of those so each will have their own, or have him focus on one or two continents per time (and hopefully ones that don't have shared animals. Otherwise, I guess he can put the pic between the two continent cards).

The more difficult level of the activity (which can be done separately) is to have him put the animals under each order or species group, etc.  I simply went thru the material covered in the Apologia study to get these names. I typed/printed/glued to cardstock and laminated them in order to create this activity.  He'll have to do this several times before it become 'easy' for him but it is a way to reinforce the material (and esp. so because he is a hands-on learner).  I can also break it down into sub-groups like the study does to simplify it a tad as well.

 This is the chart found in the section on primates.  I can also have him pull all the primate pics and place them into their correct categories too.
I am only missing a few titles that I still need to type up/print/glue on and laminate.  But again-this is a good start and will keep him plenty busy.  I store these in three Ziplock bags (one big one for all of it, 2 smaller ones hold the pics and the titles).

**side note here-Nat'l Geographic allows you to upload and use pics for your personal use. Check the royalty free section of the stock photos. Therefore, I cannot share this 'work' for you to download. You'll have to go there yourself and create your own material.

Thursday, April 19, 2012

Animal Tracks in the workbox?

Yep-tracks fit alright.  So for our HOD Creation to Christ program-we are using Apologia's Creation with Zoology 3 book.  Through the course we will cover various critters and so one project was to keep an Animal Tracks book.  Well HELLO-that is right up our CM loving family.  So I grabbed one of the bound, white books I bought from Bare Books a few years ago, and I am pleased b/cuz it is proving to be a perfect fit for this project.


On top of that-I purposefully avoided using the animal section of the Considering God's Creation program we have been using on and off for the past two years just so I could save it for this study. Perfect again.  The Animal Tracks Match game came from there.  It also has notebooking pages that discuss critters and "after their own kind" and so forth-so when it matches the reading assignments, I tossed that in for interest.  So even though most of the HOD program is the boy and I on the couch with me reading to him-this is one project that can go nicely into the workbox.

 Animal Track Match-just laminated them 
(altho they suggested coloring em but eh)
 I drew the cover-he didn't care and I rather enjoyed doing it
 I also have been putting the verses in-he is certainly capable but I have better handwriting (sometimes and he wanted to focus on the drawing of the prints more)-I will have him do some,
but he prefers lines and more space...so obviously-it is up the child when it comes to this part.


He will first look at the print, draw it in pencil then use the permanent marker to fill it in.

Wednesday, January 11, 2012

What's in the Box today?

Neil Armstrong: Young Flyer (Childhood of Famous Americans)
image from Amazon.com


Well for the boy-we are reading thru Five InA Row's Neil Armstrong [book 3] and chapter two talks about the Wright brothers-which my son asked to study a mere month or so ago-so I never did have to come up with much myself...yah...I simply am following the FIAR guide, and added a few books and a DVD on them (which is great by the way) plus a few experiments to help him see the concept of flight better.  I put all the materials he needed (except the blow dryer) to do the lift experiment in Wright Brothers for Kids book.
Ladies-save those little boxes and packing things when you can-never know when you'll need them for an experiment! Since we didn't have floral foam or a potato (yes, I need to buy some) this Scentsy box came in right handy :).

I also added three more mini-booklets for the Neil Armstrong lapbook that I am using, which is available for free via Homeschool Share. This unit was put together by one of my friends (with another gal) Leslie-who always has great FIAR activities posted on her blog!

We are not doing all the stuff in there, but again-that is the beauty of being in control-you decide.  I did have to make my own copywork pages because we do not teach D'Nealian/cursive with loops for  handwriting [we use Italic] and that is what it is in.  I simply used MS Word to type out the quote in a readable print, and then added lines for the boy to write on.  Easy peasy.  I will try to download that for you all to use if you want.  I am thinking of using something other than Scribd b/cuz usually when I upload it-it gets the lines and parameters all messed up...so I will let you know when I have that figured out.


Oh, if you did not see this on my Scrap and Lapbook Blog-these little storage gems are perfect for lapbook components.  These ones are from Creative Memories, and I am not sure if they are available any longer-but there has to be something out there that is similar (these have a flap that comes down to keep the material in place and 3 holes for a binder) -I simply pre-print/cut and place the soon to be needed items in one, pull out what we'll need for the day and when he has completed them-they go into another one to await being placed into a lapbook.  All safe and clean and protected.  Look at garage sales, at art/craft stores, scrapbooking stores, etc. for something like this-it is a wonderful "must have" for any serious lapbooking family.

Tuesday, October 11, 2011

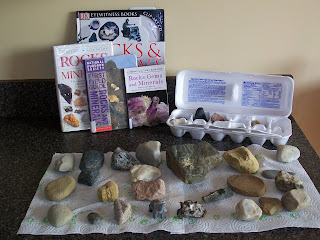
Science Idea: Rocks and Gems

This is a relatively easy workbox theme.  Just toss in a couple of the worksheets (or plain paper) along with some reference texts, a pencil [the sheets require a penny, nail and metal file to test the hardness of the rocks, so include those too] and some rocks-and you have a mini-science lesson.  

We are using the Considering God's Creation program [continuing it from last semester] for the boy's science this year, and we are currently studying Rocks and Gems. So in true CM fashion, we set up an area for displaying our rock collection.  Since we live in the gravel pit area of the state, and our sub is located on a giant [no longer used] pit-we have a HUGE selection of rocks to choose from.  For the first time-living in a gravel pit area is actually a good thing (we usually curse the abundance of these rocks-as it is very hard to get anything to grow-rocks sprout like weeds and well-they are usually a nuisance]. We have a large variety too-from fossils, to sandstone, to volcanic rocks, to some we cannot even figure out.

It is very easy to get a collection going and fun to display them.  I wish I could find those cabinets that museums use to keep their goodies, maybe I will someday, but for now-the counter will do.  The egg carton serves as a nice tote for the rocks and you can have your student label their specimens too.  We haven't gotten that far yet....but we do have some nice notes on a few so far (worksheet provided in CGC worktext-and these are very nice-thorough and useful)...

 *all books are from the library, and you need a big variety due to there being so many rocks-the cross reference is necessary. Unless you have a geologist/petrologist in the family. The elephant carving was a gift  :) but that is soapstone, so it counts.
There are only a couple of these forms in the worktext, so I made copies-as I want the boy to do quite a few to get a good idea of the variety of rocks out there.

Wednesday, September 21, 2011

Science idea: Volcano stuff

Don't blow your top!  OK, do but do it in a not too messy manner! 
Loaded up the workbox with the ingredients we needed to make his volcano blow (we got this while traveling-at the Cracker Barrel Store, but you can find them in all sorts of places-it is the easy way to make a volcano)...and included the Magic School Bus video on Volcanoes.  The Janice VanCleave's Volcanoes book is a great resource.  We did the volcano experiment using a potato cork-but couldn't get pics b/cuz it blew before we could position the camera and snap one of it.  It was OK, not super exciting but it demonstrated the pressure build up in volcanoes nicely.


You can also make an underwater volcano by putting in BKing Powder instead of soda then drop it carefully into a glass of water-we also have a mini-sub and the boy will make them both go at the same time..fun, fun!

Tuesday, May 24, 2011

Funny tie in for our workbox on insects

So yesterday, I loaded a box with a worksheet on insects (from Considering God's Creation worktext) and the needed goodies to complete it, for our science lesson for the day.  It pertained to knowing how to identify an insect and then the back has a section on the metamorphosis of several insects-one being a BEE.

As we were about to discuss the stages and glue on the sections for the bee, my hubby came in the front door and left it open (as he was going to turn around in just a few mins. to go back out) and wouldn't you know-a giant, giant bumble bee decided he would present himself as a living example of his species.  There he was, buzzing around and making a bee line for the fruity-flower scented candle in the dining room.  I mean he was a big bumbler!  The boys (meaning son and dad) grabbed the handy dandy bug catching nets and quickly snared him in it.  He was then swiftly hustled out the back door and left to figure out where he was in the world [which was our backyard].  Now, sure, we could have placed him in a container and spent some time examining him. To look over all of his bumbly body and 6 legs, 4 wings and massive head, thorax and abdomen.  But we didn't.  We figured he was already discombobulated enough.


Mind you, this is the very bumbler who buzzed around me all day on Easter, as I sat outside trying to absorb some vitamin D.  He has a real liking for our front porch area and I suspect he decided it was time to take a look about the insides of this place.  So I am sure he will present himself again somewhere down the road.

I love how little things like this happen and tie in perfectly, exactly as we were studying the very subject.  Just a funny BEEdazzling way the Lord presented a great moment for our homeschool science class.

Saturday, January 8, 2011

Jump start to our Blue Diamonds study


So for Christmas, my son received the Smithsonian Rocks and Gems kit

and he couldn't wait to dig in, so he spent quite a bit of time chopping away (and don't cha know the area he started on had hardly any gems in it. He literally found all but 3 during the final section chop fest-but hey, he was diligent and worked and worked to unearth his little gem stones, so that is a good thing.

I used this opportunity to get him interested in the up coming unit we will start this week- The Curiosity Files: The Blue Diamond (the link is to my review of it).  This week, we will work on the going thru some of the info in the study guide, reading the books I have gathered up from the library (many are on the suggested list, and even though a couple are a bit below his age level-I wanted to read them so I can offer a better review of the suggested books) and we'll watch the DVD too. 


I will have him do a couple of the worksheets during the week, and we'll end by working on the mini-booklets in the Fact File part.  I am also going to take him on a mini-field trip to the local jewelers to allow him to see a variety of diamonds; and perhaps the jeweler will be friendly enough to discuss how they look for the 4 Cs of a diamond and such-

so that is our plans with that.  I will post updates after we are into it, and when we finish it too.  

**Oh and I purchased the kit for a great price at Micheal's using a coupon, so look for deals-it should be cheaper at a local store/craft store.  And I am saving all the tools to use with digging extensions (I have come across some recipes to create the goop to cement in treasures to dig up)-so we'll do that for our dinosaur study and just for fun digs this coming spring/summer.  

Friday, April 30, 2010

Oreo Cookie Moon Phases activity

This is a fun one!  We used the vanilla flavored cookies, since they look more like the color of the moon-but obviously, the chocolate ones are just as good.

I found this activity on the Paper Plate Education site.  There are a lot of fun things there that I am sure we will also do.

Enjoy!

Since I knew the cookies wouldn't last until we could do this-I squirreled away 9 (in case one broke) and hid the stash til the day it showed up in the workbox.  I highly recommend this approach if you will not be doing this as soon as those cookies are unpacked from the grocery store.

We did school outside that day-because it was gorgeous....just packed the workboxes up and hauled em outside.  Talk about a fun way to learn.  I just clipped the laminated sheet (of course it was laminated-do you expect anything less from me?  The laminating queen? LOL) to a clip board and then totally forgot to read the directions before heading outside...you were suppose to use a knife to help cut the shapes...but teeth work fine-they are just not very accurate....
as you can see by the final results here-that and the cookies must have been dropped or something because many were cracked...but alas-that did not stop the boy (ah hem and me and Sissy) from enjoying them.  Talk about an excellent way to being totally involved with your lesson!  LOL We may have to do this again with the chocolate ones, and perhaps the Oreos that have the orange filling (like during the fall when the harvest moon shows up) for good measure.  :0)

Tuesday, April 27, 2010

This is what I have in my 8 yr old's box for tomorrow

Since we are learning about the moon now, I have added a couple goodies into the workboxes, to carry over the interest (I will show the Oreo Cookie project Wed)-such as Owl Moon [FIAR book] and the story disk to match [which gets placed on the map of the world] and some miscellaneous books referencing the moon.  Later in the week, I will put some Sculpy clay in a box, to create an Owl Moon ornament [found the idea on my pal Leslie's blog: Joyful Mother of 6 Children: look under the FIAR category on the side bar to find the great ideas for FIAR books] and of course,  all week I will add the mini-booklets to go with the Apologia Astronomy book we are using.

To bolster the whole moon theme-we carried over our "schooling" to after 9 tonight...as were able to (finally) check out the "...lesser light to govern the night" [Genesis 1:16] via the telescope (no-I didn't stuff that into the boxes, LOL) my brother gave us. That really was neat to see!  Since it is a full moon all week-we will check it out each night (assuming the clouds don't roll in) to hopefully be able to spot more of the craters and trenches; along with testing our very amateur skills in astronomy, to see if we can also hone in on some of the stars and planets too.

I found the cloth world map at WalMart a few years ago-it still may be available- it works very nicely for the FIAR disks.  I simply put on some Velcro dots to the areas the books are in (for those with no noted location-I used the clues mentioned in the book/Teacher's Guide or simply guessed).  The movie is from the library.  It is just someone reading the book with a few extra sound effects (like the train and owl call)..it gave me a break from reading it-gotta love that.  We have read this book a lot in the last few years, and although it is a bit youngish for my son, he enjoys it still.  Especially now that we are doing the Molly/McGee watch and covering the moon. (this is going to be tucked into a box with the books below)


As you can see, these are well loved books in our home.  Goodness-I think Grandfather Twilight was "new" when my eldest son was about the age my youngest son is now.  These are a bit more folktale in nature, but fun to read-and again-talk about the moon.  Great tie-ins.


There are other boxes with math, Bible study, a few games and activities too-just wanted to highlight the moon stuff.   I will have to remember to put a "science center" card in a box this week-I have a magazine about space and some new cards to go into the resource pockets...plus I will add the puzzle and a few more books to the area to jazz it up a bit.

So there is our moon theme workbox ideas for tomorrow.

As for the teen's boxes?  

Well, hers are rather boring since she has a lot of reading to do for history, and science tomorrow.  I do have her working on some papers that go with the history, so I was sure to include the scissors and glue stick she needs.  She has another Winston Grammar review page to do (so that has the paper and the cards plus the pencil in the folder), and her art project she is working on...

She is doing a sketching/shading project from the Spear's Art Studio lesson [links you to the review I did on this program]...and so I have all the necessary pencils, erasers and blending stump (not in the pic) plus the paper in the folder too.  The crumpled bag is folded up (as best as possible considering its sad state) and in there as well...the rocks and shells would rip up the folder so they are strategically placed throughout the house to give her different lighting situations to draw.

Oh woe is the poor crumply bag (but hey-that is what she is suppose to doodle)
 but alas, he will be forever etched (or is that sketched?) in her art book.  

and a few other things that currently escape my mind (as it is after 1 am here as I type this) but for the most part-my creativity went to the boy's boxes for Tuesday..maybe Wednesday she will get some more exciting ones...we'll see.

and that is it for now fellow bloggers-