Wednesday, January 11, 2012

What's in the Box today?

Neil Armstrong: Young Flyer (Childhood of Famous Americans)
image from Amazon.com


Well for the boy-we are reading thru Five InA Row's Neil Armstrong [book 3] and chapter two talks about the Wright brothers-which my son asked to study a mere month or so ago-so I never did have to come up with much myself...yah...I simply am following the FIAR guide, and added a few books and a DVD on them (which is great by the way) plus a few experiments to help him see the concept of flight better.  I put all the materials he needed (except the blow dryer) to do the lift experiment in Wright Brothers for Kids book.
Ladies-save those little boxes and packing things when you can-never know when you'll need them for an experiment! Since we didn't have floral foam or a potato (yes, I need to buy some) this Scentsy box came in right handy :).

I also added three more mini-booklets for the Neil Armstrong lapbook that I am using, which is available for free via Homeschool Share. This unit was put together by one of my friends (with another gal) Leslie-who always has great FIAR activities posted on her blog!

We are not doing all the stuff in there, but again-that is the beauty of being in control-you decide.  I did have to make my own copywork pages because we do not teach D'Nealian/cursive with loops for  handwriting [we use Italic] and that is what it is in.  I simply used MS Word to type out the quote in a readable print, and then added lines for the boy to write on.  Easy peasy.  I will try to download that for you all to use if you want.  I am thinking of using something other than Scribd b/cuz usually when I upload it-it gets the lines and parameters all messed up...so I will let you know when I have that figured out.


Oh, if you did not see this on my Scrap and Lapbook Blog-these little storage gems are perfect for lapbook components.  These ones are from Creative Memories, and I am not sure if they are available any longer-but there has to be something out there that is similar (these have a flap that comes down to keep the material in place and 3 holes for a binder) -I simply pre-print/cut and place the soon to be needed items in one, pull out what we'll need for the day and when he has completed them-they go into another one to await being placed into a lapbook.  All safe and clean and protected.  Look at garage sales, at art/craft stores, scrapbooking stores, etc. for something like this-it is a wonderful "must have" for any serious lapbooking family.

Saturday, December 10, 2011

Craft Idea: Reindeer Candy Canes

I am sure this is nothing new in the crafting world-but it is adorable.  Just pop the book (Lisa's or the one on the Candy Cane) and the supplies into the workbox and then you'll have a lovely family activity!  (not the glue gun if you will be using that)

The Adventure of Christmas: Helping Children Find Jesus in Our Holiday Traditions
image from Amazon.com

Using Lisa Whelchel's ADVENTure of Christmas book as our jumping off point (on the history of the candy cane) we made these puppies or shalt I say deersies (? new word there for ya)...they are really easy too.

No candy cane deer was injured during the posing of this picture, neither was it strangled by the string. 

This is actually hanging from one of those magnetic hooks and let me tell ya, these are awesome. Before getting them, I had that hook thing you hang on the door, the one where part of it hooks to the top of the door and that caused the weather stripping to gap letting in cold air.  Plus, these won't hurt the paint on the door.  I am so excited to have our wreath hanging on our front door without all the annoyances those hooks caused.  This is a spare and I put it up on the inside of the door-made for a great photo op here. :)

Supplies needed:

Red and white candy canes (we only had these green/red ones to use during this session, but will be using red/white for the additional ones we'll make this weekend) 
Pipe Cleaners/Fuzzy Stix (Meijer's brand is called this) -One per deer [18"] (now Lisa says to use 2 but we only used one-and it looks just fine)
Wiggly Eyes (we have colored ones but black eyed ones are good too) obviously 2 per critter
Ribbon (about 8" per deer)
Small Pom-Poms (I found red ones in a package of at least 30 or so in it-I believe at JoAnns but any craft store should have these, black would be cute too)
Glue (I used a glue gun but will use tacky glue when we do this with the little kiddos, we didn't find the glue melting the wrapper so as long as the tip doesn't touch the stuff, it should work OK)
Scissors

Directions:

Basically, glue the eyes and nose on the front hook part of it.  Tie a bow around the neck area.  Cut the pipe cleaner in half.  Twist one half around and form antlers. Cut the second section into two parts, twist each half onto the straight antler parts.  We manipulated the pipe cleaner a bit to better resemble antlers.  

Story behind it:

This is the shortened version of it:  A candy maker decided to make candy sticks for the babies/toddlers to suck on to keep them quiet/non-fussy.  Then in the 1670s a choirmaster decided to angle them into shepherds crooks, again this was used to keep the little ones quiet.  And, after all shepherds use crooks to herd their sheep and Jesus is called our Shepherd in the Bible.  Then later on, hundreds of years later (or so it is told) a candy maker in Indiana decided to add the thick red stripe to remind folks of Jesus' blood that was shed on the cross,  Then smaller ones were added to symbolize the lashes Jesus received prior to being hung on the cross.  The white color is to remind children that Jesus lived a life without sin.   The peppermint was added to mimic hyssop which is a  plant that was used in Old Testament times for sacrifices.  Obviously, Jesus was the ultimate sacrifice for mankind by defeating death and bearing our sins on the cross.  Apparently, the hardness of the candy mimics the fact that Jesus is our Rock of Salvation.  Awesome heh?  Oh yea, turn the candy cane upside down and you have yourself a "J"...which is another way to remember Jesus.  This is a cute and tasty treat that opens the door to sharing with family and friends, what Jesus did for us some 2000 years ago.  
The Legend of the Candy Cane
There is also a great book that explains the candy cane-we read that last year when we did the Christmas Lapbook:  The Legend of the Candy Cane (which you can find the mini-books to on Homeschool Share) It was written by Lori Walburg.


Enjoy!!!
Tuesday, October 11, 2011

Science Idea: Rocks and Gems

This is a relatively easy workbox theme.  Just toss in a couple of the worksheets (or plain paper) along with some reference texts, a pencil [the sheets require a penny, nail and metal file to test the hardness of the rocks, so include those too] and some rocks-and you have a mini-science lesson.  

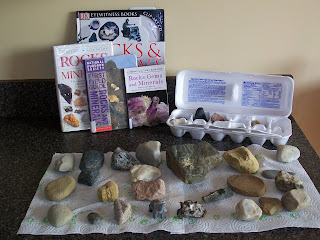
We are using the Considering God's Creation program [continuing it from last semester] for the boy's science this year, and we are currently studying Rocks and Gems. So in true CM fashion, we set up an area for displaying our rock collection.  Since we live in the gravel pit area of the state, and our sub is located on a giant [no longer used] pit-we have a HUGE selection of rocks to choose from.  For the first time-living in a gravel pit area is actually a good thing (we usually curse the abundance of these rocks-as it is very hard to get anything to grow-rocks sprout like weeds and well-they are usually a nuisance]. We have a large variety too-from fossils, to sandstone, to volcanic rocks, to some we cannot even figure out.

It is very easy to get a collection going and fun to display them.  I wish I could find those cabinets that museums use to keep their goodies, maybe I will someday, but for now-the counter will do.  The egg carton serves as a nice tote for the rocks and you can have your student label their specimens too.  We haven't gotten that far yet....but we do have some nice notes on a few so far (worksheet provided in CGC worktext-and these are very nice-thorough and useful)...

 *all books are from the library, and you need a big variety due to there being so many rocks-the cross reference is necessary. Unless you have a geologist/petrologist in the family. The elephant carving was a gift  :) but that is soapstone, so it counts.
There are only a couple of these forms in the worktext, so I made copies-as I want the boy to do quite a few to get a good idea of the variety of rocks out there.

Wednesday, September 21, 2011

Science idea: Volcano stuff

Don't blow your top!  OK, do but do it in a not too messy manner! 
Loaded up the workbox with the ingredients we needed to make his volcano blow (we got this while traveling-at the Cracker Barrel Store, but you can find them in all sorts of places-it is the easy way to make a volcano)...and included the Magic School Bus video on Volcanoes.  The Janice VanCleave's Volcanoes book is a great resource.  We did the volcano experiment using a potato cork-but couldn't get pics b/cuz it blew before we could position the camera and snap one of it.  It was OK, not super exciting but it demonstrated the pressure build up in volcanoes nicely.


You can also make an underwater volcano by putting in BKing Powder instead of soda then drop it carefully into a glass of water-we also have a mini-sub and the boy will make them both go at the same time..fun, fun!

Sunday, August 28, 2011

Math Idea: Visual way to understand multiplication and division

Using a few simple items, you can help your student "see" exactly what it means to multiply or divide.  Now this is not a new idea by any stretch of the imagination-but a different way to do it...and a great one for the workbox.


*Please note-unless you want the equations to be on your cards permanently -do not use a Sharpie-use a Vis-a-Vis wet-erase marker.  I accidentally grabbed the wrong pen for the photo op.  You will need a few bags of marbles, or [like I chose] those glass gems from the dollar store. I will need to snag a couple more for the higher level mult./division problems-but 2 are a good start.  I found the Post-It note look alike room decor thingies at a Dollar Tree. But since you never know if you can find them or not-just choose something you feel your child will enjoy, which has a surface large enough to write out the equations. Laminate as many as you think you'll need, so that you can reuse them over and over again.  Pre-fill your target multiples or divisibles in the Ziplocks.   I was able to get enough bags made for 2,3,4,5,6,and7 X7 before running shy of the gems. The beauty is that I can reuse the stuff to create a new set at any time.


The object is to have the appropriate amount of gems in a Ziplock bag. They then move the gems into groups per the card's instructions.  So for the multiplication-the bag has 14 gems.  The rule is the child is to group them according to the number listed first (so 2 sets of 7) then the next one (7 groups of 2). They can then add up the sets to get the answer. I think I will have the boy use a reg. sheet of notebook paper, to write out the equations then the answer.  For whatever reason, he seems to not be "getting" why one would multiply or divide-it eludes him.  Being that he is a visual/tactile learner-this little project will hopefully "show" him the why/reason/results.

For Example:

Now I could have easily done this with a multitude of items [I did use matchbox cars with my oldest son], but knowing this particular student will easily get side tracked-that is not going to work.  And if I didn't have them in bags-they'd end up all over the house being used for various things such as a track outline for his cars. This way-they are contained. That is also helpful for those with little ones around-not that they couldn't open the bag, but it is somewhat corralled. I wouldn't suggest having the student do more than 5 at a time-to avoid over load.  Also-I think doing just multiplication or division is better than mixing it up which would also prevent confusion. I do think they suggested writing it out like, "Separate these into 5 sets of 2" or something like that-but with the little cards-there is no way I can scribble that on it.

UPDATE:  Found this in the book, Math Wise: Over 100 Hands-On Activities that Promote Real Math Understanding by Jim Overholt and Laurie Kincheloe. Pages 109-111, labeled "Ziplock Division".

Tuesday, June 7, 2011

Ask Sheri: Dana asked about the Geography Centers

A fellow blogger, Dana, wanted to know:

How did you find all the post cards? What exactly did a child do at this center for 15 min.?

This is a two part question, so I will answer it as such:
\

As for where I found the post cards-I joined the Yahoo group Postcard Kids to get most of the ones I needed for the 50 states. [I haven't been on this group in eons, so not sure how well the exchanges are working now-you'll have to investigate that to know for sure]. I did run into a couple of issues tho: 

#1:  I couldn't find folks that had the cards for the "challenging to find states"; or who could find a few of the cards I needed [not there fault-they just were not available] so, I solved that issue by getting some when I traveled, or by finding a picture of one online and then copy/pasting it to my Paint program to make a postcard. But I believe I only had to do that for a 2 or 3 and that was after about a year of trying to find em via the group. 

#2-some folks are not [well, how can I say this nicely?] uh, "mindful" of returning the agreed upon card(s) in exchange for what I sent.  I got burned on a few in the beginning, but the group moderator was great at bumping those postcard bums outta the group.  So do be mindful of this problem-but usually folks are very, very good at exchanging.  Also, give folks time to get yours to ya...like a couple weeks is fair (after all life goes on and sometimes getting the cards out has to be delayed due to stuff happening).  All in all it was a great experience. 

As to what the child does whilst at the center-now that is totally up to you and what you want to accomplish.  But around here that usually involves a few things:

1.  Coloring in the states we have covered on the laminated sheet of the US.

2.  Opening the mailbox to see what new cards have arrived and filing them when done (into a plastic card box).  Examine the Circle with the State names and Capitals too.


3.  Looking over any new maps I put in or worksheets that I added.


4.  Doing a puzzle of the US.


5.  As for the added worksheets-I have failed a bit there but my big plan is to have ones that use the little compass and ask him to do something (like go outside and stand on the porch-which way does the front of our house point? Or What corner of the back of the house points W? Things like that.  I can also do Long./Lat. pages where he has to use the mini-help guides [in the pocket] to answer questions.  Things like that).  


6.  Read a book on the state we are covering.

These are merely suggestions.  Remember too-we do NOT do the center everyday nor do we even do it once a week (yep, I could but usually don't).  I try to set it up once we have covered 5 states, then ask him to do the above #1-4 and any additional stuff I find to toss in there.

Again-use what you have laying around the house.  Find simple games, puzzles, projects that you could toss near the center for the child to do and set the time according to the amount of activities you want them to accomplish.  I am sure other folks have some awesome ideas too-and if you know of some, please share.  I have been looking at the shower curtain {just trying to justify that cost! Eww} with the world on it for when we do the world geography-thinking of games and such we can do using that.  So there are tons of ideas-just depends on what you want to accomplish! 

HTH ya out a bit!  Thanks for asking too!

Tuesday, May 24, 2011

Funny tie in for our workbox on insects

So yesterday, I loaded a box with a worksheet on insects (from Considering God's Creation worktext) and the needed goodies to complete it, for our science lesson for the day.  It pertained to knowing how to identify an insect and then the back has a section on the metamorphosis of several insects-one being a BEE.

As we were about to discuss the stages and glue on the sections for the bee, my hubby came in the front door and left it open (as he was going to turn around in just a few mins. to go back out) and wouldn't you know-a giant, giant bumble bee decided he would present himself as a living example of his species.  There he was, buzzing around and making a bee line for the fruity-flower scented candle in the dining room.  I mean he was a big bumbler!  The boys (meaning son and dad) grabbed the handy dandy bug catching nets and quickly snared him in it.  He was then swiftly hustled out the back door and left to figure out where he was in the world [which was our backyard].  Now, sure, we could have placed him in a container and spent some time examining him. To look over all of his bumbly body and 6 legs, 4 wings and massive head, thorax and abdomen.  But we didn't.  We figured he was already discombobulated enough.


Mind you, this is the very bumbler who buzzed around me all day on Easter, as I sat outside trying to absorb some vitamin D.  He has a real liking for our front porch area and I suspect he decided it was time to take a look about the insides of this place.  So I am sure he will present himself again somewhere down the road.

I love how little things like this happen and tie in perfectly, exactly as we were studying the very subject.  Just a funny BEEdazzling way the Lord presented a great moment for our homeschool science class.

Wednesday, May 4, 2011

Hey if you don't visit my other blogs-you may wanna to see this cool art project

I have all the instructions and pics there for ya.  It was a fun one to do-just remember that it will take several days b/cuz you have to allow for drying in between.  But the results are well-keepsakes!


Instructions
I will be moving this post to my main blog soon (2014)

Enjoy!

Friday, April 8, 2011

I told you I would get creative~eventually~My Artist Memory Game

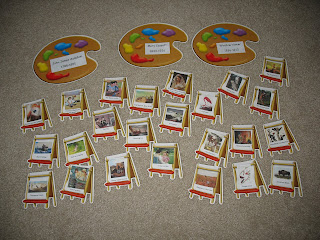
So, I purchased those dollar store bulletin board packs way back, just knowing I could make something from them (this one has 5 each of an artist palette, glue bottles and packs of crayons) and then a pack of 25 little easels.  What I thought I could use them for, I had no idea.  But I could see the potential.  Finally, it came to me-we study at least 3 artists a year.  So why not make a matching project/game that my son could do, to help retain the artist styles and typical art work?


I visited Olga's Gallery for Mary Cassatt's and Winslow Homer's images; and for J. J. Audubon's art to create these little gems!  I had fun-and I was able to get 8 different easels for each artist palette.  I will grab some more when I go to the local Dollar Tree, and hopefully find some more of these packs so I can continue with this (adding artists as we go).  I have yet to laminate them, but was so excited to show them off. 

This is a very easy project-simply size the pics [on your MS Word or similar program] to fit the easel and type the title (I didn't put the year for 2 reasons-wasn't sure I could fit it all on, and the pics dates were not listed, so I have to search each one to get that...so they remain dateless..but you could do that if you wish), and on the back put the initials of the artist in a corner (this serves as a self-check, but don't tell your student if you want them to really work at it. This is a Montessori trick...it allows you to say, "Check it", if you don't have time to come and do so yourself.  You need to be careful with children who will simply flip it to get the answer, and not sit a moment and ponder the picture to make a guess. My son knows the "trick", but also knows I expect him to be honest about trying to figure it out first-which he will).

This makes a great workbox activity.  Just store in a Ziplock or envelope and let em at it. :0)

And without much further ado-My Artist Study Memory Game

 3 artist palettes with the individual artist's names and DOB/DOD
with 24 art easels (8 each)


So when the child plays, they look thru the mixed up pile, 
and place the correct image under the correct artist!

~Have fun~

Friday, April 1, 2011

Ultimate Blog Party

Ultimate Blog Party 2011

It is that time of year again-the Ultimate Blog Party is up and running! If you haven't joined the fun yet-please do so!  You can meet many new bloggie pals and even enter to win oodles of awesome prizes!

If you are linking in from my main blog, Homeschooling on a Wing and a Prayer, I thought I would take a moment to explain the main purpose of one of my favorite blogs I have in my collection. 


The What's in the Box? blog is designed to highlight ways to implement the Workbox system, and use it to streamline and organize your schooling adventures (hey-you don't have to be a homeschooler to use this system!  It has been used very successfully in PS/PS settings-esp. with children who have special needs.  It would be a great addition to any preschool or day care too!)~it is easy and fun and let me tell ya-makes your days much more productive~
sample ideas on what to put in the boxes

You don't have to use the system exactly how Sue tells you too-in fact, I am a bit of a rebel as I make sure to tell folks to tweak and rework it so it fits your family to a "T".  After all, no two fams are alike and neither are your students.  The beauty of this program is that is centralizes the child's material in the "boxes" (could be folders, drawers and whatever else you can find that serves you best) so that there is no longer that "What do I do next?" or "But I can't find my pencil." or "I dunno what I am suppose to do." or the dreaded dawdling that turns a 15 min. math lesson into a 3 hour nightmare of a struggle.  By placing everything they need for that lesson in their box, you create a stress free zone.  Each box gets a new lesson (different subject and be sure to add some "just for fun" ones in there too), and with anywhere from 3-12 boxes per child, your day will be much less stressful. When the material in the box is done, the number card goes onto their chart and they move to the next box until they are all done! :0)

Space Center Idea

This system brought the spark back into the way we do school (and yes-I slip and don't always use it but let me mention here-when I don't use it, our days are lame and not nearly as productive as they could be).  Sure, it requires more work on my end because I have to get myself organized and pack the boxes-but man-it is so worth the extra hour or so per week (more time usually when you have more kids-and if you read my posts regarding how to get a bunch of pre-work done and scheduling ideas-you will save time too) so that our days run smoothly and the kids are motivated and finish their studies much more efficiently.

Do spend some time trolling thru here-I have lots of links to other great workbox pals, ideas and ways to implement this system.  I haven't been able to post much of late here-but as the school year comes to an end, I will have more time to dedicate to new projects and ideas that I will be sure to post about!

Enjoy!