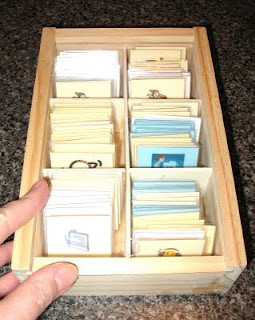
I had a tackle box I bought at Kmart to hold some of my stamping supplies, so I emptied that, snapped off the two ends on one plastic divider strip (they come out easily) so I could have a bigger section for the calendar cards...it won't be too hard to keep them in order, if I am careful...and there are enough sections here to hold two kids' worth of calendar, "do workbox #..." cards-one set per day/per kid (different color for each day), and the lunch cards. I think I paid less than $5 for the tackle box-but I have seen tons of different types of storage boxes like this, that would work great too. I wrote on it what was in it-plus it has a snap on top, which is very needful!
The lunch cards all fit into one section.

This beauty is what the boy made at one of the Home Depot Kid's Workshops. It is suppose to be for nuts and bolts and such-but hey-why not use it for cards? It has a sliding clear plastic top, and it holds the cards perfectly. I have the boy's on the left, the teen's on the right, to keep them straight.
Oh goodie! I see I did take a pic of it-well, here it is!

I made a bunch of cards for the computer games we have for him-and I did a couple for Starfall too.

Our girlie will be starting her driver's ed classes, so had to make these!
I made several of each card per kid. That way if we are going on a field trip, both kids' books will have that card in it. Or the library, HS group, walking, etc.
I will try to get some of these loaded to my scribd pages-but I have to go thru and make sure they are more generic-but really these are easy to create yourself. I used our MS Word program, made grids of 3 across by 4 down per page at 1 3/4" X 1 3/4 ", then clicked the clip art section, chose what I thought would work, shrunk them to fit the spot and added instructions if necessary (you cannot put a lot down-so make it short and sweet), then copy/pasted it into as many blocks as I needed. Then you simply save, print on card stock, cut em out, laminate them (tricky b/cuz you need to be sure they don't slide into the section b4 them and get laminated together-lost a library card that way)-and then cut again, Velcro 'em and whallah! You are done!
I can get the big grid schedule pages up too, but there won't be the lines to guide the tabs. I will have to go and measure out those and see if I can make a template or something-but to be honest-it is going to take me some time to do all of this. I have a boat load of reviews coming due that I must pay attention to, it is inching up on Christmas and I really want to be done dealing with anything schooly by mid-Dec. So it may take til next year. The big grid sizes are 3x5 down of 2x2" and the other sheet (with the calendar) has a bigger box in the top for the calendar card, then 2 3x3 grid boxes of 2x2. You will have to print those on card stock and decide if you want to stamp them-or as the boy pointed out-you could laminate and then let the kids sticker up the areas that are not in the grid space. Or leave em blank.
So that is my major project news-hope you enjoyed reading about it.
**Oh, and before someone asks-there is nothing wrong with a daily schedule strip, it was just becoming very time consuming to redo those every nite, this way I only set the days up one time per week (outside of any carry over cards). I was able to trim down the cards I already had to fit the new schedule grids-so I was able to use those too.


No comments:
Post a Comment